Dark Chocolate Sea Salt Nut Bars-Easy Recipe
Dark Chocolate and Sea Salt Nut Bars are the ultimate treat for anyone seeking a delightful balance of rich, decadent flavor and satisfying crunch. Imagin extracte biting into a bar where intensely flavored dark chocolate melts alongside the nutty goodness of your favorite nuts, all punctuated by tiny crystals of sea salt that pop and awaken your palate. This isn’t just another snack; it’s an experience. We adore these Dark Chocolate and Sea Salt Nut Bars because they hit all the right notes: sweet, salty, and undeniably satisfying. What truly elevates them is the contrast – the deep, slightly bitter notes of good quality dark chocolate perfectly complement the earthy, roasted flavors of the nuts, while the sea salt acts as a brilliant enhancer, cutting through the sweetness and adding an addictive complexity. They’re incredibly versatile, perfect for an afternoon pick-me-up, a post-workout reward, or even a sophisticated addition to your dessert table. Get ready to discover your new go-to recipe for these irresistible Dark Chocolate and Sea Salt Nut Bars!
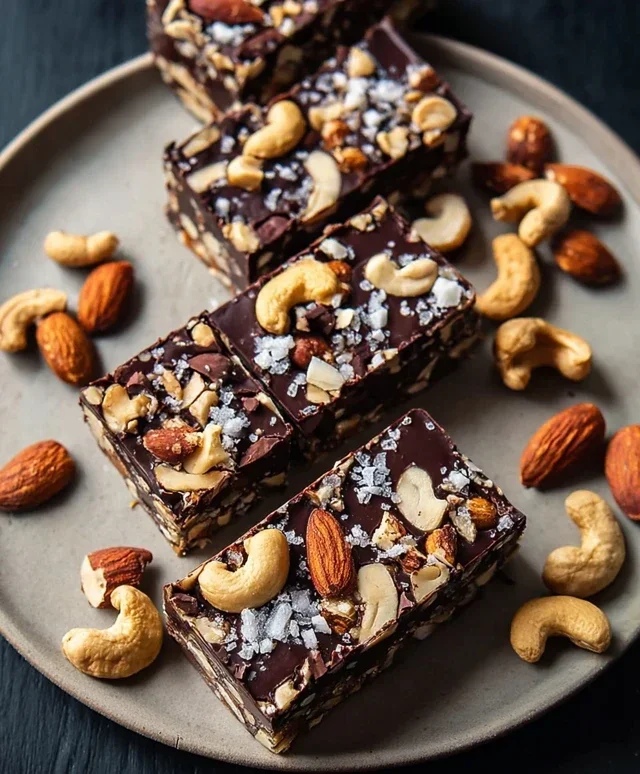
Dark Chocolate and Sea Salt Nut Bars
These Dark Chocolate and Sea Salt Nut Bars are my go-to for a satisfying, subtly sweet, and perfectly crunchy snack. They’re incredibly versatile, allowing you to customize the nuts based on what you have or love. The combination of rich dark chocolate and the hint of sea salt is simply irresistible, and they’re surprisingly easy to whip up. Forget those overly processed granola bars; these are the real deal, packed with wholesome ingredients and bursting with flavor. Whether you need an afternoon pick-me-up, a pre-workout boost, or a homemade treat to share, these bars are a winner.
Ingredients:
Instructions:
1. Preparing the Nut and Rice Base
The first step is to get our nutty foundation ready. In a large bowl, combine your chosen unsalted nuts. I’ve found that a mix of cashews, peanuts, and almonds provides a wonderful balance of creaminess and crunch, but feel free to experiment! If you’re using whole nuts, I recommend giving them a rough chop. This isn’t about making them tiny, but rather creating pieces that will bind together well and be easier to bite into once the bars are formed. Think about half-inch to one-inch pieces. Next, add the puffed rice to the bowl. This ingredient is key for adding lightness and a satisfying crispness to the bars. Gently toss the nuts and puffed rice together, ensuring they are evenly distributed.
2. Creating the Binding Syrup
Now, it’s time to create the magical binder that will hold all these delicious ingredients together. In a small saucepan over medium-low heat, gently warm the brown rice syrup. You don’t want it to boil, just to become warm and more fluid. This will make it easier to mix with the other ingredients and ensure a good, sticky consistency. Once the brown rice syrup is warm, remove it from the heat and stir in the vanilla extract and the 1/2 teaspoon of sea salt. The vanilla adds a lovely depth of flavor, while the sea salt is crucial for cutting through the sweetness and enhancing all the other flavors. Whisk these together until well combined.
3. Combining and Pressing the Mixture
Pour the warm syrup mixture over the nuts and puffed rice in the large bowl. Now, this is where the real work begin extracts! Using a sturdy spatula or a wooden spoon, stir everything together thoroughly. You want to ensure that every single piece of nut and puffed rice is coated in the syrupy mixture. This might take a minute or two of good stirring, so be patient. Once everything is well combined and sticky, it’s time to press it into your prepared pan. I like to line an 8×8 inch baking pan with parchment paper, leaving some overhang on the sides. This makes it incredibly easy to lift the entire slab out once it’s set. Transfer the nutty mixture into the lined pan and press it down firmly and evenly. The firmer you press, the more cohesive your bars will be. Use the bottom of a glass or another piece of parchment paper to help you get a really compact and even layer.
4. Melting and Drizzling the Chocolate
While your nutty base is firming up in the pan, let’s get our dark chocolate ready. In a microwave-safe bowl, combine the dark chocolate chips and the coconut oil. Microwave in 30-second intervals, stirring well after each interval, until the chocolate is completely melted and smooth. The coconut oil helps to create a glossy, smooth chocolate coating that hardens beautifully. Once the chocolate is melted, you can either spread it evenly over the top of your pressed nut mixture, or, for a more decorative finish, drizzle it artistically. I often do a combination, spreading a thin layer first and then drizzling the rest. If you’re feeling fancy, you can even use a fork to create little zig-zags or swirls.
5. Chilling and Finishing Touches
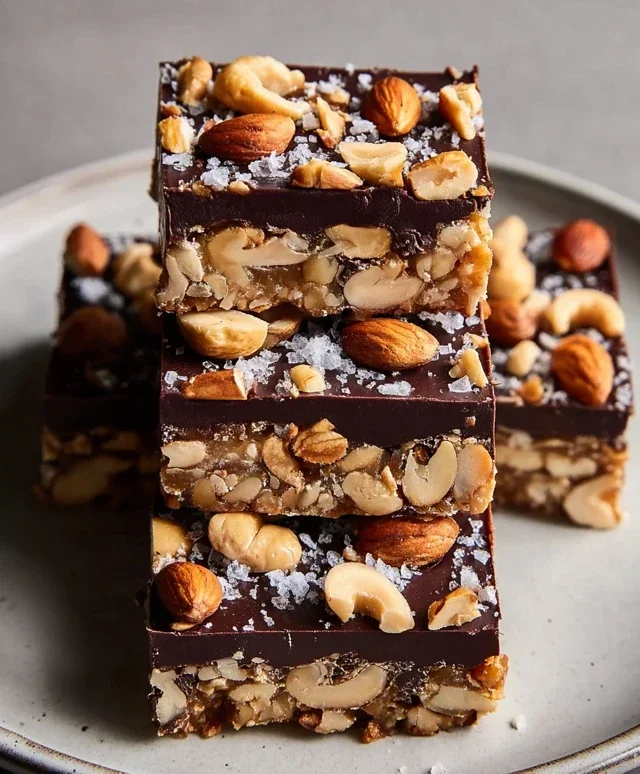
This is the crucial step for setting everything into firm, sliceable bars. Once the chocolate is on top, sprinkle the optional flaky sea salt over the melted chocolate. This adds a delightful textural contrast and an extra pop of salty goodness. Now, carefully place the pan into the refrigerator and let it chill for at least 1-2 hours, or until the chocolate is completely set and the bars are firm. The chilling process is essential for the bars to hold their shape when you cut them. Once chilled, use the parchment paper overhang to lift the entire slab out of the pan. Place it on a cutting board and, using a sharp knife, cut it into your desired bar shapes. I usually aim for about 12-16 bars, depending on how thick I want them. Store these delicious bars in an airtight container in the refrigerator for the best texture and longevity. Enjoy!
Conclusion:
And there you have it – a simple yet incredibly satisfying recipe for Dark Chocolate and Sea Salt Nut Bars! These bars are a true triumph of flavor and texture, offering a delightful balance between the rich intensity of dark chocolate and the subtle crunch of nuts, all elevated by those perfect little bursts of sea salt. They’re wonderfully versatile, making them an ideal treat for a midday pick-me-up, a post-workout refuel, or even an elegant dessert. The ease of preparation means you can whip up a batch whenever the craving strikes, and the adaptability of the recipe ensures you can tailor it to your personal preferences. I truly encourage you to give these Dark Chocolate and Sea Salt Nut Bars a try; you won’t be disappointed by how deliciously simple they are to make and how quickly they disappear!
Frequently Asked Questions:
Can I substitute the nuts?
Absolutely! While the recipe calls for a blend, feel free to experiment. Almonds, walnuts, pecans, or even a mix of your favorites work wonderfully. Just ensure they are raw and unsalted, or adjust the added salt accordingly.
How should I store these nut bars?
For the best texture, I recommend storing these bars in an airtight container at room temperature for up to 3 days, or in the refrigerator for up to a week. Refrigeration will make them firmer, which some people prefer!
Can I make these bars vegan?
Yes, you can! Simply ensure your dark chocolate is dairy-free. Many high-quality dark chocolates are naturally vegan. The other ingredients are typically vegan-friendly.
Dark Chocolate and Sea Salt Nut Bars
Delicious and easy no-bake bars packed with nuts, puffed rice, and dark chocolate, finished with a sprinkle of sea salt.
Ingredients
-
2 1/2 cups unsalted nuts of choice (3/4 cup cashews, 3/4 cup peanuts, 1 cup almonds)
-
1/2 cup puffed rice
-
1/4 cup brown rice syrup
-
1 1/2 teaspoon vanilla extract
-
1/2 teaspoon sea salt
-
1 cup dark chocolate chips
-
2 teaspoons coconut oil
-
Flaky salt for topping (optional)
Instructions
-
Step 1
Line an 8×8 inch baking pan with parchment paper, leaving an overhang on the sides for easy removal. -
Step 2
In a large bowl, combine the nuts and puffed rice. -
Step 3
In a small saucepan over medium-low heat, warm the brown rice syrup and vanilla extract until just combined. Stir in the 1/2 teaspoon of sea salt. -
Step 4
Pour the warm syrup mixture over the nut and puffed rice mixture. Stir well to coat everything evenly. -
Step 5
Press the mixture firmly and evenly into the prepared baking pan. -
Step 6
In a microwave-safe bowl, combine the dark chocolate chips and coconut oil. Microwave in 30-second intervals, stirring in between, until melted and smooth. -
Step 7
Pour the melted chocolate over the nut mixture in the pan. Spread evenly. Sprinkle with flaky salt if using. -
Step 8
Refrigerate for at least 30 minutes, or until the chocolate is firm. Cut into bars and serve.
Important Information
Nutrition Facts (Per Serving)
It is important to consider this information as approximate and not to use it as definitive health advice.
Allergy Information
Please check ingredients for potential allergens and consult a health professional if in doubt.